|
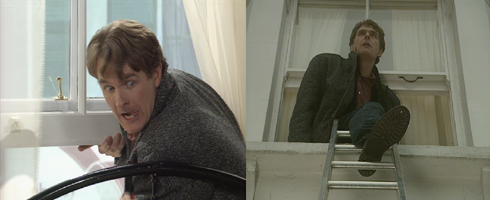
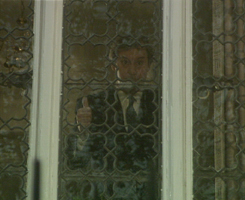
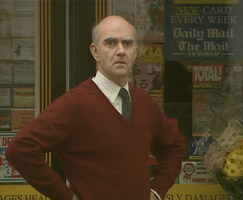
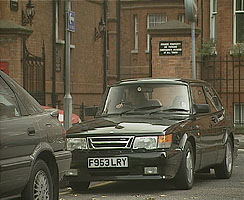
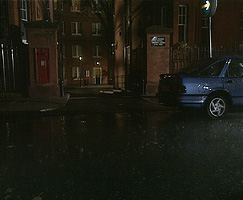
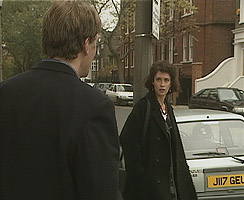
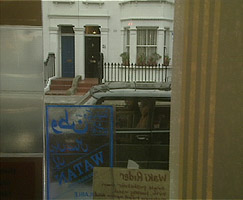
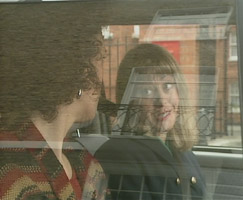
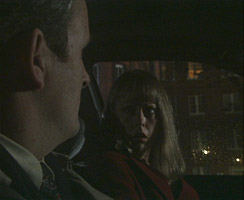
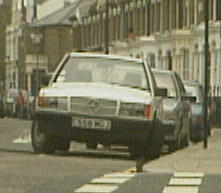
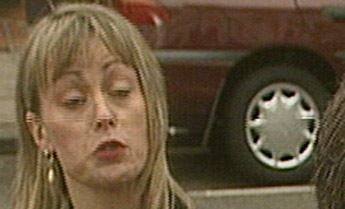
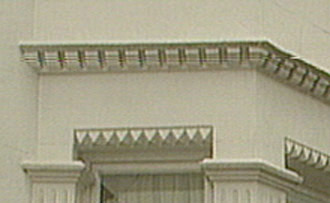
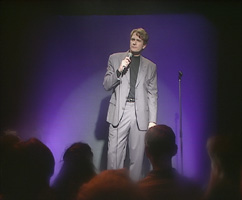
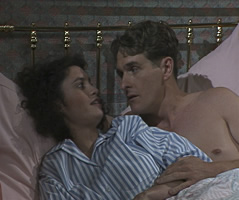
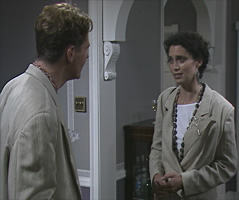
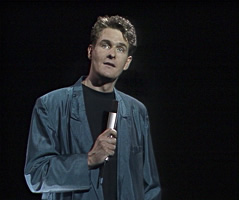
We've all heard the phrases "digitally restored" and "remastered" frequently bandied around and perhaps you might have been tempted to conclude that they are nothing more than meaningless marketing buzzwords aimed at making you part with your hard earned cash. So is it all a con or does it really make a difference to your enjoyment of DVDs? Well, now you can judge for yourself with this illustrated account of the work undertaken for the Joking Apart Series 2 release, complete with before and after comparisons. To round off the article, we'll focus on the restoration of the pilot that is also included on the DVD. COLOUR CORRECTION AND GRADING Here's a good example, illustrated by the two stills below, where Mark climbs out through a window. The interior, on the left, was, of course, a studio set and was well lit. The exterior was shot on location in daylight and should have been at least as bright, if not more so. Bizarrely, it was not only about half as bright but also had a distinctly green tint, the result of a common technical problem during the editing process. Note in particular how Mark's jeans don't look the colour we'd expect. Now roll your mouse over the right-hand frame and you'll see how it should have looked, and indeed, does on the DVD release. And whilst we're on the subject of windows, here's another one with the same noticeable green tint. Once again, it's a rollover image so you can see before and after restoration. This colour cast affects every single location shot that appeared in series two. This is because all location shooting for the entire series took place and was edited in one go, prior to the first studio recording. So the technical problem that occurred in the edit suite plagued every exterior scene throughout series two, plus the occasional interior one that was also shot on location. So how did this happen? Ironically, it was an unfortunate consequence of trying to maintain the highest quality. Chances are, your DVD player is connected to your TV using the RGB or component inputs for this very reason - to maximise quality. The things is, the video is actually sent as three separate signals and each of these must remain the same level for the picture to look as it is supposed to. As the signals only have to travel down a very short cable, it is highly unlikely that they will suffer any noticeable change. In the edit suite, the machine playing back location tapes was also connected via a component input, but unlike a domestic DVD set up, the signal path was rather more convoluted. The likelihood of the signal levels being altered along the way was thus rather higher. Any change would either result in a slight difference in the brightness or an overall magenta or green colour-cast that also affected the brightness. The following images illustrate this perfectly - not only are they tinted green but the areas of the picture that should be black are too bright (or lifted, to use the technical term), making them look flat and lifeless. Now let's look at the very first location shot in series two as that presented an additional challenge - the tricky issue of mixed lighting. The shot starts on a close-up of some adult magazines and pans to show Mark's car pulling up outside, seen through the shop window. Whilst the eye can cope perfectly well with the difference in colour between electric light and daylight, the camera can't. The production team opted to make the shot through the window look correct, so consequently the shop interior looked decidedly dim and yellow. If we try to correct that so it matches the lighting of the main studio set for the shop, look what happens to the view through the window. That's more offensive than the original. The solution is apply with a computer a colour correction which gradually changes as the camera pans. The settings for each end of the shot are radically different, although you never would have known. This is the only way to get both ends to look as they should. Now compare the difference. The same technique was used later in the episode to correct a shot where Trevor opens his front door to Becky. The point of remastering is to make each shot look as good as possible. You can't simply apply a universal setting to the location material to lose the green tint. Each shot has to be adjusted individually to produce a consistent result - a process known as grading. Looking at the original master tapes, there were some jarring variations from shot to shot, most of which can be attributed to the light changing during the course of the day. And shooting during the short days of November only exacerbated this, but careful grading of the 15 minutes of location work has finally resolved this problem for the DVD release.. In this next shot, grading went beyond just losing the colour cast. It was also used to compensate for the glare caused by reflections on the glass. VIDEO NOISE AND COMPRESSION One problem that plagued series 2 took me by surprise - video noise. Whilst series 1 had been very clean, it wasted no time in rearing its ugly head this time as the brief opening scene of episode one was crawling with it. Luckily, it was rarely as bad as that therafter but I decided the entire series would benefit from varying degrees of noise reduction. Noise is a critical issue when it comes to DVD. In order to squeeze so much video onto a disc, DVDs use a technique known as compression. Someone came up with the bright idea that instead of trying to record the entire picture, all you need to record is the changes. And it not only works - when there's not much movement in the picture, you record very little data - it can be amazingly efficient too. It's not just a case of squeezing the proverbial quart into a pint pot, so much as two gallons! And if you want a more precise idea, consider this. One hour of broadcast digital video requires 93Gb of storage. When you realise that the entire 167 minutes of series two fits comfortably onto a 8.5Gb DVD, complete with commentaries, subtitles and menus, you can start to guage just how efficient it can be. It does help that Joking Apart isn't full of dynamic action; if you tried fitting 167 minutes of Dr Who on a single disc, you'd notice a marked loss in quality as that would be pushing the compression system beyond its design limits. So what has this to do with noise? Well noise is essentially constant, tiny changes in the picture. The compression technology can only cope with so much change at once. When you have noisy video, too much of the processing power is wasted on the noise, leaving too little for the wanted parts of the picture and the image quality suffers adversely. It's a double whammy! So noise really is the enemy of DVD and needs to be eliminated wherever possible. Cameras always produce more noise when light levels are low and, of course, there are lots of dimly lit scenes in series two. The opening of episode one referred to previously is a case in point - a dark, bedroom scene - but at least it wasn't a true night shot. The camcorders used on location never really excelled in the noise stakes either. And guess what? In episode two, you get the worst possible scenario - a night shoot on location! The grottiest shots in the entire series were not surprisingly to be found here, none more so than the very first of the night shots, which was shockingly bad. A shot of Robert and Tracy in their car pushed it close though. And to make matters worse, both also suffered from the dreaded black lift and green colour cast. It's not really possible to demonstrate just how bad the noise problem was without the use of video clips because it's the constant movement of the noise that lends its ability to annoy the viewer. Unfortunately, I'm not permitted to use clips from the series on this site. Nevertheless, here's a magnified section of the previous shot by way of a before and after comparison. It should be understood that it's not possible to eliminate noise altogether, just reduce it. Digital video noise reduction (DVNR) is beyond the humble resources I have at my disposal as the magical boxes of electronics that do this cost many tens of thousands of pounds. So I had to sub-contract this work at a hourly cost of £150-200. One of the potential side-effects of DVNR is that it can degrade the picture, and I learnt this the hard way. The DVNR work done at a respected facility appeared to do the trick. It was only when I got home and properly compared the treated material with the original that I discovered the picture had not only been cleaned up but also softened to a degree I considered unacceptable. That meant I had to write off the cost of the work and look elsewhere. At the second time of asking, I found a system I was happy with. It's called Archangel and is extremely powerful. There are a myriad of parameters that can be tweaked and in the hands of an expert, some incredible results are possible. No softening this time. But it's still capable of some very unwanted results if not handled with care. There is a famous tale of Archangel misidentifying a flock of seagulls as noise, which it then proceeded to remove from shot! DROPOUTS BY THE THOUSAND Dropouts are another thing that are hard to demonstrate without moving pictures as its their transient nature that makes them annoying. Think of something you see out of the corner or your eye - there and then gone in a flash - and you get the idea what I mean. See one as a still frame and you might wonder what all the fuss is about. So what is a dropout? It's a small but noticeable picture flaw that is a result of the video tape shedding some of its magnetic recording coating. You've almost certainly seen some very bad and/or frequent ones on VHS, particularly tapes that are old or have been played heavily. Here are some zoomed in examples, although as I said, they look far worse on moving video. Note how the dropout changes the shape of the headlamp on the left. In the next example, the dropout affects Tracy's nose and ear and the wheel of the car. All dropouts must be repaired ahead of tackling the colour cast. If you colour correct first, you cannot adjust it subsequently without having to re-repair the dropouts. Here's one more example, for good measure: Just as in series one, most of the dropouts were to be found in the location footage which was shot on a cassette-based camcorder format known as Beta SP. It's notorious for dropouts. Unfortunately, there's a lot more location material in this series so I knew I was in for an incredible amount of work. I can't tell you precisely how many individual dropouts I had to repair but I'd guess it was close to two thousand. Each one had to spotted, located and then exported as a series of still frames into Photoshop where they were repaired by hand, using a cut and paste technique. Some were quick and easy to fix using a tiny, corresponding part of the picture from the previous frame, but some were much trickier because of movement. With those, all you can do is cut and paste multiple pieces until the still frame looks faultless. The worst one I had to do took two hours! GRADING THE STAND-UP Something else that benefitted from restoration was the stand-up material. It was shot on a darkened set where the only illumination was a spotlight on Mark and a blue light on the background. Everything else should be in deep shadow and therefore black or close to black. Instead, the blacks were invariably lifted, so required darkening. Note how much crisper and dramatic this makes the restored version. Of course, you need to be sympathetic to this being being a smoky environment but justification for the regrading as carried out can be found in episode five. Curiously, the sequences there were precisely how I thought the others should have been all along and required no tweaking whatsoever. THE OPENING TITLES The other major item that needed attention was the title sequence. Originated on film, it suffered from some rather nasty sparkle. Sparkle is the result of specks of dust and dirt on the film negative which then gets reproduced on the final film print as bright white speckling. The end of the titles where it turns blue was particularly bad - so bad that I swear the negative must have been dropped on a dirty surface, where it picked up not just dust but the odd hair too. The production team were clearly aware of the severity of the problem because on this series they looped the end of the titles to avoid the worst of the sparkle and then mixed through to the studio earlier than on series one. However, it wasn't a perfect solution because you could see the same faults repeat every eight frames within the loop. The image below isn't big enough to reveal the problem properly. Click on it and a full size rollover image will open in a new window.
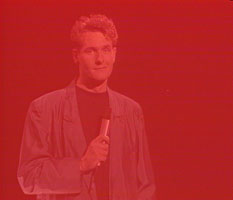
For series one, I'd created a master set of repaired titles which I edited onto the front of each episode, just ahead of the mix. That meant all I then had to eliminate was the sparkle that occured during that mix. For series two, I was able to reuse the repaired titles fron the first series. WHERE DO YOU DRAW THE LINE? That's always the big question with restoration. I take the view that if I spot something, I'll attempt to fix it. Sadly, that's not a common policy - too many companies aren't prepared to invest the time and, more to the point, the money to put things right. It's understandable to a degree - some cult titles are a risk as there is a good chance that they might lose money - but I prefer to go the extra mile. By way of illustration, here are some of the additional things I undertook: I was able to adapt my dropout repair technique to lose the occasional sound boom that had accidentally dipped into shot. There was a problem with one of the cameras in episode five - it had a tiny hole in its tube. This appeared on screen as a small white dot, similar to a dead pixel on an LCD monitor. The camera was used throughout the episode and every time it was on screen, so was the fault. To make things worse, there are a lot of dark shots in that episode, so it's more visible than it might have been. Ensuring the repair was always invisible was painful and time-consuming. There were occasional instances where one camera's shots looked a different colour to the others. The most offensive example of this was during Trevor's exchange with Dr. Strickland outside the toilet in episode two - as this was shot on two cameras, the colour would change on every cut! A colour corrector was used to repair any mismatched shots. I went so far as to clean up all the on-screen shots that Mark watches on his TV in episode two. The black and white material from the Russian Revolution was so grotty that there was no way of making it look perfect (and nor should you try to remove its archive character) but it has nevertheless been improved no end. THE PILOT Dropouts and noise were again a bugbear through the pilot and were repaired as before, so little additional comment is necessary. However, there was a brief section of tape damage which required considerable attention - nearly 100 separate repairs within just six seconds of programme. The overall look of the pilot as received from the BBC was extremely disappointing. In addition to the noise, the pictures were soft, flat and severely lacking in colour. Yet certain sequences had been reused in the first episode of series one and never looked particularly out of place. Comparing the corresponding sequences in both shows revealed just how inferior the pilot was. Taking episode one as my guide, I individually adjusted the levels of each of these sequences within the pilot until they matched. I then went through the rest of the pilot, shot-by-shot and scene-by-scene, making considerable changes as necessary to acheive a consistent look throughout. By far the hardest challenge of all was the restoration of the sixteen second Comic Asides sting that opens the programme. Believe it or not, those sixteen seconds took me fully four days to repair! Half of that time was invested in the one second transition at the end. I'll move onto that in a moment. The rest of the sting was plagued by the most ridiculous amount of sparkle. To improve it as much as I have done, required intense hand-retouching. There are literally thousands and thousands of individual repairs, and that only dealt with the worst of it. I would have been there forever if I'd been mad enough to try and eliminate it all. The sting ends on a full frame of intense red that mixes through over the course of one second to the opening shot of Robert Bathurst's stand-up. I couldn't believe how appalling it looked. It had all the classic hallmarks of being recorded from VHS, although I knew it hadn't. The noise and colour streaking had to be seen to be believed. It was hard to conceive that this had once been deemed fit for transmission. Whatever, there was no way I was letting it disgrace the DVD. The trouble was, I was in uncharted territory. I had no surefire way of fixing this. I had some ideas but it was a really a matter of trial and error, having to invent new techniques and partial solutions as I went along, occasionally having to backtrack as I hit a dead end, but slowly, slowly inching towards the kind of clean result I was seeking. The finished repair is impressive. Click on the image below and a large rollover image will open in a new window.
Essentially, what I did was to separate the sting and the studio shot so that I could work on them independently, then mix them back together afterwards. With the sting, I precisely matched the colour of the end frame and extended it; with the studio shot, I very carefully cut out Mark from the noisy background frame-by-frame, eliminated the red tint (again, frame-by-frame), touched up the footage in Photoshop as necessary and then superimposed him back onto a plain black background. If that sounds simple, it wasn't. It was a very painstaking process and took two days to restore that single second of video, but it was a challenge I relished. The before and after rollover image is a testament to the success of my efforts and the final version which appears on the DVD. All in all, the amount of work involved in the complete restoration of these seven episodes was immense and although most people will remain blissfully unaware of any of it, it's very satisfying to know that nothing is left to spoil their enjoyment of this DVD release. CRAIG ROBINS |